How to Tile a Wall: A DIY Guide
Date Published: 2 March 2021

When you remodel a bathroom or kitchen, you want to find ways to save while still achieving the look you want. Taking on DIY projects is the simplest way for you to keep a few extra quid in your pocket without going out and getting an engineering degree.
Anyone can learn how to tile a wall, even if you aren’t sure which bit of the saw is the pointy end. You’ll find all the tools you need at your local DIY or hardware store, and your local tile expert can give you any extra hints you need for unique tile or surface choices.
The techniques used for tiling a wall aren’t much different from tiling a floor. Use these instructions to get your tile project started!
What You Need:
- Wall tiles
- Filler
- Adhesive primer
- Ready-mixed or powdered tile adhesive
- Spacers
- Grout
- Sealant & cartridge gun
- Ruler
- Tape measure
- Tile cutter
- Notched trowel
- Trowel
- Grout spreader
- Grout shaper
- Claw hammer
- Level
- Spirit
- Safety gloves and glasses
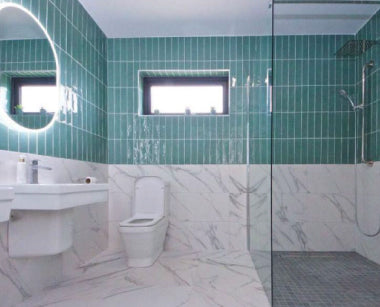
How to prepare a wall for tiling

The success of your bathroom tiling project starts with your preparation. So put the kettle on, get your tape measure, a pencil, and a pad, and prepare to recall some of those maths lessons.
To get started, sketch the room and capture the dimensions using your tape measure. Use these measurements to calculate the area of space you will tile, and include doors, windows, or cupboards. You’ll hand these measurements off to your tile expert, and do be sure to buy up to 10% extra in case any tiles break or in case you were always more of a languages student than maths.
Once ready, it’s time to prep the wall. You’ll start by removing anything still hanging, including paint, wallpaper, loose plaster, screws, and hooks. If you have any cracks or holes, get spackling. When the wall is clean, ensure you have a level space.
Grab a long, flat piece of timber to check for bumps. A spirit level will help, too. Be sure to sand down any lumps jumping out more than 5mm.
Tip: Keep the timber and use it to create a gauge stick reflecting your tiles’ length and width. It will become your ally once you start sticking tiles on the walls.
The next stages of your wall tile prep depend on the surface. The simplest way to prep a wall is to use a tile backer board, but if you like a challenge, use these instructions:
- Drywall: Leave any fresh plaster to dry for at least 30 days before tiling. Once ready, use a sander to create a texture that will aid the adhesive. Be sure to dust and vacuum to remove any particles before applying your adhesive.
- Cinder blocks: Scrub the wall to remove chunks of brick and dust. Fix any cracks or chips. Choose either direct mortar or Kerdi board panels for tiling. Keep in mind that blocks, cement, and brick tend to be uneven, so it’s best to use a tile backer board.
- Plywood: Most plywood needs extra treatment before tiling because it’s sensitive to temperature changes. You’ll need a wood-friendly thinset to complete the work, but tiling over plywood is still not a preferable option.
How to put up wall tile

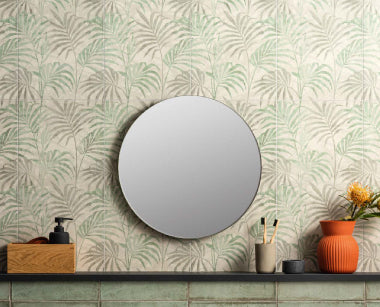
Our Victorian Florentine Tiles make a stylish kitchen splashback
With Day 0 done, it’s time to start laying tiles. Keep in mind that you’ll want to work quickly, so give the wall a once-over again before starting. Then, follow these instructions.
- Prep the wall surface, if required, by using two coats of primer.
- Use your spirit level to find your centre point and create a line. Start tiling in the centre of your wall to keep your pattern symmetrical. Use your gauge stick to help you get started.
- Use the trowel to add tile adhesive to the wall to cover one square meter. If your tiles are larger than 20 x 20, apply adhesive to the wall and the tiles’ back for extra support. If possible, start at the bottom of the area and work upwards.
- Using a 45-degree angle, spread the adhesive in horizontal strokes with your notched trowel.
- Add your first tile to the button corner of the wall. Press it firmly, using a twisting motion. Put a second tile above your first tile and apply it the same way. Wipe adhesive off the tiles as you work.
- Stick a tile spacer between the first two tiles and adjust the position. You’ll grout over the spacers, so make sure the spacer remains flush with the wall.
- Put a new tile on the adhesive area and repeat the process above.
- Keep working until you have all the whole tiles on the wall.
- Let the adhesive dry according to the manufacturer’s instructions.
Finish the corners
Now that your adhesive is dry, it’s time to get to the niggly bits in the corners. Because you so cleverly started in the centre of the wall, the corners will be simple to finish and relatively even.There are two types of corners in tiling projects: internal and external corners.
In this case, start installing wall tile on one side of the corner, using a notched float. Be sure to give the tile appropriate clearance between the edge of the tile and the corner: if you don’t, they might expand and create peaks. When dealing with an internal corner, you might use an inside corner trim. You don’t need the trim, but it does add a modern look.
The same rule applies to tiling outside corners. You can use the trim or leave it, but you don’t need to worry about the clearance space.
Grout, seal & done
With your wall looking great, it’s time to grout and seal your wall, which will protect your tiles. Remember to work quickly when grouting wall tile, because grout doesn’t wait to start working. Just as with your tiling, work in sections to avoid a mess.
- Use your trowel to put a small amount of grout onto the tiles.
- Then, use your grout spreader to spread it into the area between the tiles diagonally.
- Once finished with an area, use a sponge to remove excess grout from the tile face. Be careful of the joints.
- Leave the grout to finish drying.
- Prepare your sealant according to the manufacturer’s instructions.
- Apply sealant in a continuous line, working quickly and avoiding squeezing the trigger too hard (if using a sealant gun).
- Use a sealant smoother to remove any lumps or bumps.
- Leave the sealant to dry.
Can I tile over existing tile on walls?
So you already have a tiled kitchen or bathroom, and you want a fresh look? Not to worry, you have two options.
The first is to chisel off the current tiles, which is a laborious, thankless job with no benefits. The second option is to treat the existing tiles with a grinder to allow the adhesive to stick to it. Be sure to clean the tiles carefully to remove dust and debris before applying primer and adhesive. And don’t forget to check for hollow tiles; you can hear them by knocking on them. A hollow tile can cause your new tile work to collapse, and it’s not pretty.
Can I tile over a painted wall? How do I remove paint from the walls before tiling?
You want to remove paint, bits of paper, and dust before tiling because they can prevent the adhesive from working properly. A sander or scraper can remove most paint quickly.
Some say you can leave paint that adheres well to the wall, but it’s best practice to get rid of it altogether. Better an hour or two of scraping now than watching your tiles peel off the wall down the road.
I want to use large tiles on my walls. How do I prepare?
Heavy tile installation requires you to ensure that your wall is perfectly flat, you have the right grout joints for the tile’s dimensions, and you use the right adhesive and adhesive application technique. Remember, the maximum weight of the tile on a suitable substrate is 20kg/m².
Do you have more questions about tiling a wall? Halo Tiles has your answers from design to installation. Get in touch today for an expert, local opinion.